

Can pull-up bars damage door frames?
Yes, pull-up bars can damage door frames through pressure, friction, mounting holes, or force applied to weak trim; a compatible bar installed exactly as instructed reduces the risk but does not guarantee a damage-free doorway. This 2026 guide explains which mounting styles cause which problems, how to inspect your doorway, and when to choose equipment that does not load the frame.
- Can pull-up bars damage door frames? Yes: pressure, rubbing, screws, and weak trim create different damage risks.
- Beferra's doorway fitness equipment requires the same fit and frame checks as any home pull-up setup.
- No-drill installation does not mean damage-free installation; inspect contact points and follow the bar's instructions.
- Choose a freestanding setup when your doorway cannot meet the manufacturer's mounting requirements.
Why this matters
A doorway is part of your home, not automatically a suitable exercise anchor. The bar, its mounting method, and the supporting surfaces must work together; a strong-looking bar cannot compensate for loose trim or an unsuitable opening.
For your 2026 home fitness setup, treat frame protection and fall prevention as separate checks. Beferra's guide to daily doorway pull-up bar safety addresses the use question; this page focuses on what happens to the doorway itself.
A bar that leaves no visible mark is not automatically secure, and a padded bar is not automatically harmless. Inspect both the equipment and the surfaces carrying its load before you train.
Can pull-up bars damage door frames?
Yes. The damage depends on where the bar transfers force: against the sides of the opening, onto the surrounding trim, or through fasteners into a mounting surface. Repeated installation and movement can also rub or compress the finish at contact points.
Start by identifying the mounting design rather than relying on a label such as doorway bar. The following comparison describes general equipment categories, not the specifications of any particular product.
| Mounting option | Best for | Main advantage | Damage risk or limitation |
|---|---|---|---|
| Pressure-mounted bar | A doorway explicitly permitted by the bar's instructions | Installs between opposing surfaces without drilled mounting holes when designed for that use | End pads can compress or mark finishes; inadequate grip creates a slipping risk |
| Leverage-style doorway bar | Compatible openings with sound trim meeting the manufacturer's requirements | Removable setup that distributes contact across several surfaces | Loads trim and contact areas; loose casing or an incompatible profile makes it unsuitable |
| Screw-mounted bar | Permanent installation into an approved supporting surface | Uses fixed mounting hardware | Creates holes; incorrect fasteners or placement can damage the mounting surface |
| Freestanding pull-up station | A room with enough clearance and a suitable floor | Does not use the door frame as its support | Requires floor space and correct assembly; it is not automatically stable in every setup |
These options solve different installation problems. Choose the mounting method your home can support, not the one that merely fits across the opening.
Cosmetic marks and structural warning signs are different
Cosmetic damage includes scuffed paint, compressed finishes, and visible contact marks. Those marks affect the appearance of your doorway, but they do not by themselves establish whether the installation is secure.
Cracking, separating trim, moving joints, or visible deformation require a different response. Stop using the bar and have the affected area assessed before loading it again; do not cover the problem with padding and continue training.
A fresh mark also deserves attention when it appears alongside movement. Inspect the mounting surfaces and follow the manufacturer's troubleshooting instructions rather than assuming the mark is harmless.
Pressure-mounted bars: watch the contact surfaces
Pressure-mounted bars hold between opposing surfaces using the mechanism specified by their manufacturer. That pressure is part of the installation, so the doorway must tolerate it without compressing, deforming, or allowing the pads to slip.
The practical benefit is a removable setup without drilled holes when the design permits it. The trade-off is direct pressure on the jamb or other approved contact surface, plus dependence on correct adjustment and surface condition.
Best for: a compatible doorway with firm, intact contact surfaces. Reject a location with flaking paint, visible damage, or surfaces outside the installation requirements. A snug fit alone does not establish compatibility.
Do not respond to movement by repeatedly tightening the bar beyond its instructions. Excessive pressure can damage the contact area, and extra tightening does not turn an unsuitable doorway into a suitable one.
Leverage-style bars: inspect the trim they load
Leverage-style bars use contact points around the doorway to support the user. Depending on the design, those points include the upper trim and surfaces on opposite sides of the opening; the exact arrangement belongs in the product's instructions.
Removability is the advantage. Loading trim is the limitation: decorative casing and its attachment are not automatically suitable for supporting exercise equipment.
Best for: an opening whose dimensions, trim profile, and condition meet the manufacturer's requirements. Do not assume that a deep-looking trim ledge proves adequate strength. Loose joints, gaps, and previous repairs need assessment rather than guesswork.
Check every contact point after positioning the bar. If the bar sits crooked, presses onto an edge instead of the specified surface, or visibly moves the casing, remove it and reassess the fit.
Screw-mounted bars: holes are part of the installation
Screw-mounted bars attach with hardware rather than relying solely on pressure or removable contact points. Their advantage is a fixed mounting arrangement when installed into the approved supporting material; their drawback is permanent alteration and dependence on correct installation.
Best for: a permitted permanent setup with a verified mounting surface. Follow the specified fasteners, locations, and installation procedure. Screws into decorative material alone do not establish a suitable exercise anchor.
For a 2026 rental setup, check the property rules before drilling. Repairing holes later does not replace permission, and a landlord's permission does not establish that the chosen surface can support the bar.
If you cannot verify the supporting material, stop before installation. A qualified installer can assess the proposed location without asking you to discover its limits during a workout.
Why doorway damage varies
Door frames do not face the same loading conditions with every bar. These factors determine where damage begins and whether a setup belongs in that opening:
- Mounting method: Pressure pads, trim contact, and drilled fasteners apply force differently.
- Frame condition: Loose casing, cracks, soft contact areas, and previous damage undermine the installation.
- Contact fit: Misaligned pads or incorrectly seated supports concentrate force where the design does not intend it.
- Surface finish: Paint and other finishes can show rubbing or compression even when the underlying material remains intact.
- Installation accuracy: Incorrect adjustment, missing hardware, or an omitted mounting step changes how the bar is supported.
- Exercise movement: Swinging, jumping onto the bar, and abrupt loading introduce forces beyond a controlled pull-up.
These are inspection priorities, not a formula for predicting damage. The correct decision comes from the bar's stated requirements and the actual condition of your doorway.
How do you check a doorway before installing a pull-up bar?
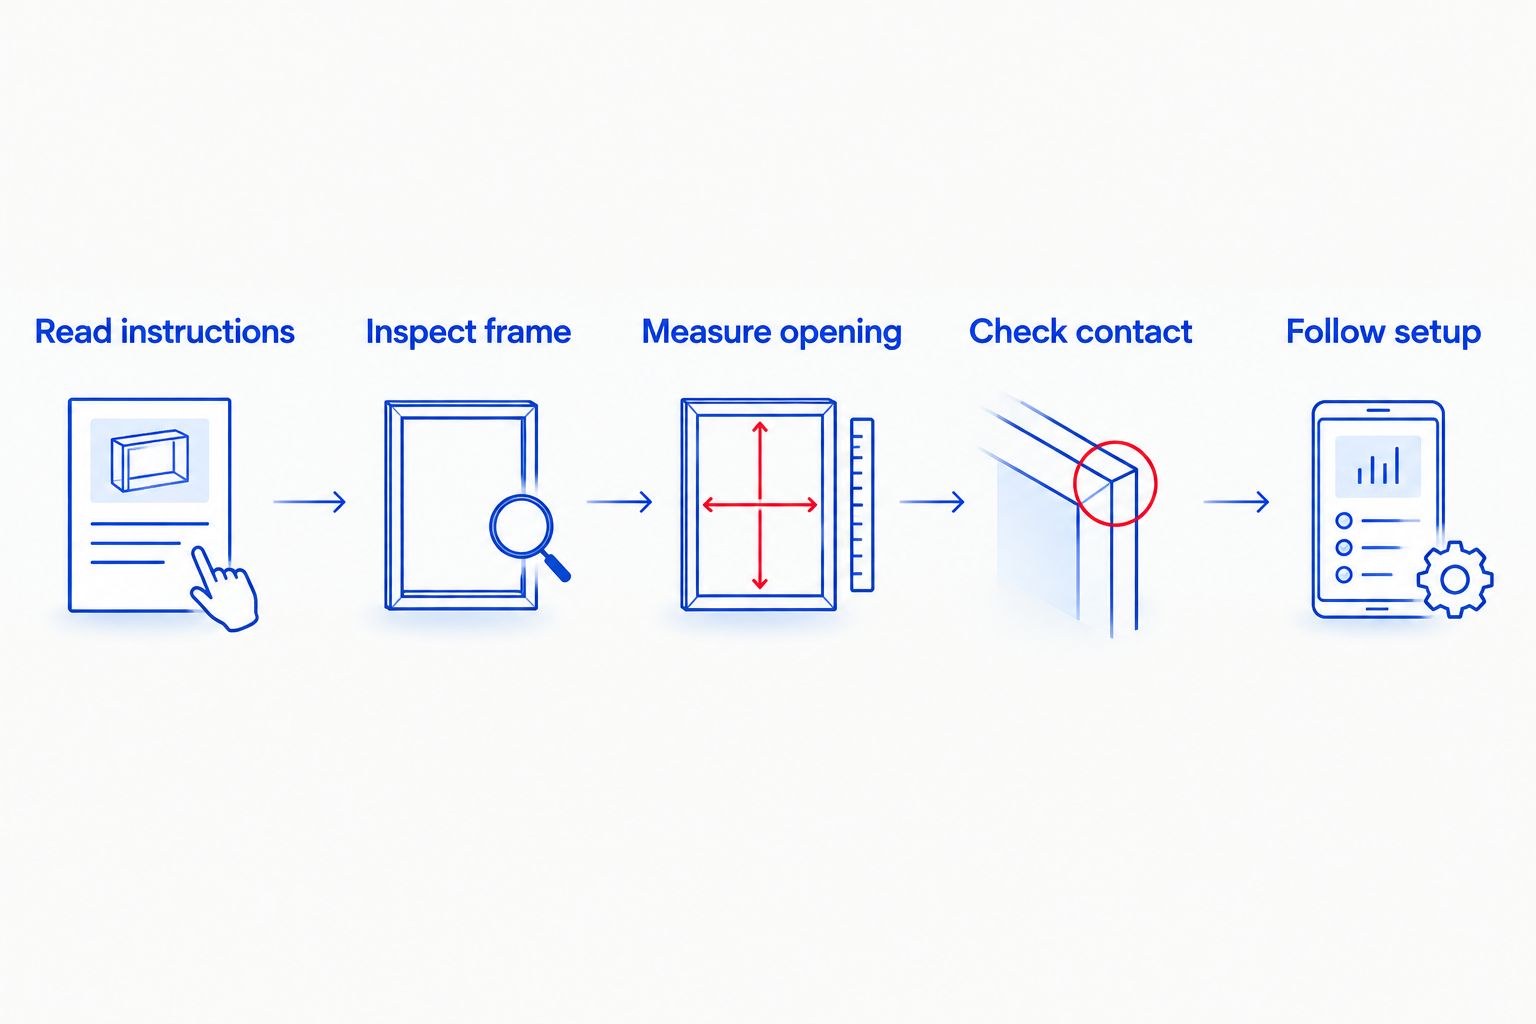
Use this sequence when setting up a doorway bar in 2026. It is a screening process, not a substitute for the manufacturer's instructions or an assessment of questionable building material.
- Read instructions. Identify the mounting method, permitted surfaces, doorway dimensions, hardware requirements, and user restrictions. Keep the instructions available during installation.
- Inspect frame. Look for cracked paint over joints, separating casing, loose trim, dents, and previous repairs. Do not load damaged or visibly moving material.
- Measure opening. Compare the opening and relevant trim dimensions with the stated fit requirements. Include every measurement the manufacturer requests, not just doorway width.
- Check contact. Position the bar as instructed and verify that each pad or support rests on its intended surface. Check that nothing sits against a fragile edge or obstruction.
- Follow setup. Complete the prescribed adjustment, fastening, and pre-use checks. Do not improvise a bodyweight test or assume that a brief hang certifies the frame.
Take clear photos of the contact areas before installation. Those photos give you a baseline for spotting new marks or changes after removal; they do not prove that the frame is structurally suitable.
If you find a problem at any stage, choose another location or another equipment type. Do not let the convenience of an available doorway decide whether it carries your workout.
How can you reduce door-frame damage during use?
Follow the bar's permitted exercise list and use controlled movement. If swinging, kipping, weighted pull-ups, or accessory attachments are not expressly permitted, do not add them to the setup.
Inspect the contact areas whenever you install or remove the bar and follow the manufacturer's inspection schedule. Watch for displaced pads, changing alignment, fresh compression marks, cracks, or movement in the trim.
Stop immediately if the bar shifts, the frame moves, or a new crack appears. Remove the equipment according to its instructions and resolve the cause before another workout. Continuing with lighter effort does not correct a mounting problem.
Keep the route through the doorway clear while exercising. Do not position yourself where an opening door, another person, or nearby furniture interferes with the movement or the installed equipment.
Do protective pads prevent door-frame damage?
Protective pads do not guarantee a damage-free installation. They separate the bar from the finish, but the doorway still carries the force applied through the mounting points.
Use only padding or protective accessories permitted by the manufacturer. Extra towels, foam, or improvised spacers change the contact geometry and grip; protecting paint is not a reason to alter a safety-critical connection.
Inspect the original pads for damage and correct placement. Replace components through the manufacturer's approved process rather than patching a worn contact point with household material.
Can you use a pull-up bar in a rented home?
You can use a doorway pull-up bar in a rented home only when the installation meets both the equipment requirements and your property rules. A no-drill design still carries the possibility of scuffs, pressure marks, or damaged trim.
Before buying equipment for a 2026 rental, confirm whether removable exercise mounts are allowed and whether drilling needs permission. Keep the property decision separate from the safety decision: approval does not verify frame strength.
Choose a freestanding option if using the doorway conflicts with either requirement. You still need suitable floor space, assembly, and use conditions, but you avoid making the frame the support point.
When should you skip a doorway pull-up bar?
Skip the doorway installation when the frame is damaged, the opening fails the stated fit requirements, or you cannot verify the intended mounting surface. Also skip it when the exercise you want to perform is outside the bar's permitted use.
A freestanding station removes door-frame loading but takes up floor space. Resistance exercises performed without a door anchor avoid that same mounting issue, although they are not an identical replacement for pull-ups.
Beferra's home fitness equipment is best for consumers choosing functional exercise tools for everyday use. For a doorway-specific option, the Adjustable Door Pull-Up Bar is described as fitting a range of doorways and supporting upper-body training at home; verify its current installation instructions against your opening before choosing it.
That description does not establish compatibility with your frame or promise mark-free use. Fit and installation requirements decide the purchase—not the convenience of the doorway.
FAQ
Can pull-up bars damage door frames even without screws?
Yes, no-drill pull-up bars can damage door frames through pressure, rubbing, or loading weak trim. Avoiding mounting holes does not eliminate contact damage or make an unsuitable frame safe.
What's the best pull-up setup if I want to avoid loading my door frame?
A freestanding pull-up station avoids using the door frame as its support. It still requires adequate space, correct assembly, and use within the manufacturer's instructions.
Is a pressure-mounted bar better than a leverage-style bar for protecting trim?
Neither mounting style is automatically better for every doorway. Pressure-mounted bars load opposing contact surfaces, while leverage-style designs load their specified supports around the opening.
Can I put a towel under my doorway pull-up bar?
Do not add a towel unless the manufacturer's instructions expressly permit it. Improvised padding changes how the bar contacts and grips the doorway.
Does a pull-up bar's weight rating mean my door frame is strong enough?
No, the bar's weight rating does not establish the strength of your door frame. The installation must also meet the manufacturer's surface, fit, and mounting requirements.
Should I keep using my pull-up bar if the door trim starts moving?
No, stop using the bar if the door trim moves. Remove the equipment as instructed and have the mounting area assessed before loading it again.
What should I check before buying a Beferra doorway pull-up bar in 2026?
Check the installation instructions, doorway fit requirements, permitted mounting surfaces, and intended exercises before buying. Match those requirements to your actual doorway rather than assuming adjustability guarantees compatibility.
One last thing
The product's weight rating describes the equipment under its stated conditions, not the strength of your particular doorway. Keep those decisions separate when you choose your 2026 setup.
Photograph the unloaded frame again after removing the bar and compare it with your baseline. If the finish changes, inspect the contact point; if the frame changes shape or moves, stop using that location.